In part one of this series, we covered the basics of the Scripting Bridge and how one might leverage this technology with Swift. In part two, we explored the idea of using Swift protocols to describe the scriptable interface exposed by an application. Here we’ll look at how we can automatically generate the necessary protocols and package them up in an OS X Framework for easy reuse.
To translate the sdp-generated collection of Objective-C interfaces to a collection of Swift protocols, we’ll leverage the Python bindings for libclang. The first step is to install the bindings. This can be done as follows in a Terminal window
curl -O https://pypi.python.org/packages/source/c/clang/clang-3.5.tar.gz
tar zxf clang-3.5.tar.gz
cd clang-3.5
sudo python setup.py install
The next step would be to write a Python script using the clang module to perform the transformation. For the present discussion, we’ll skip the details of the Python code and simply make use of sbhc.py (Scripting Bridge Header Converter), which is available as part of the SwiftScripting project on GitHub. The sbhc.py script is invoked as follows (using Acorn as an example)
/path/to/sbhc.py Acorn.h
sbhc.py does its work silently. The output of the above command would a file named Acorn.swift in the current directory. Acorn.swift would contain a set of enums and protocols for the Acorn application. The SwiftScripting project includes a second utility, sbsc.py (Scripting Bridge Scripting Classes). sbsc.py is used to generate a separate Swift file which defines a single enum representing the scripting classes for the target application. sbsc.py is invoked as follows
/path/to/sbsc.py Acorn.sdef
Note that the sbsc.py script does not make use of the clang module. It invokes xmllint on the sdef specified on the command line to extract the class strings and then emits the enum in a straight-forward manner.
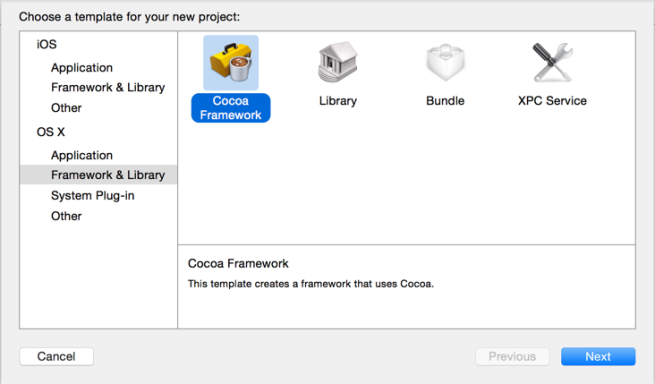
Now, we can create an OS X framework to house all of the necessary ingredients. This framework can then be imported by Swift automation scripts when targeting a particular application. First, create a new OS X Framework project in Xcode.
You’ll probably want follow a consistent scheme when naming the frameworks that you create. The convention that I’ve adopted is to use the name of the target application followed by Scripting. So, for the Acorn application, the name I use for the scripting framework is AcornScripting.
Once the framework project has been created, you’ll need to add the following files (again, using the Acorn as an example):
Acorn.swift
AcornScripting.swift
The only other task you’ll need to perform in Xcode is to ensure that the Swift source files are designated as members of the framework target. With that taken care of, you can now build the framework.
To build the framework, visit the directory containing the framework’s .xcodeproj file and issue the xcodebuild command. This will perform a release build and all of the output will be contained in the build directory below the project directory. If the build succeeds, the framework will be located under build/Release. The framework should be copied or moved to the /Library/Frameworks directory.
In part four of this series, we’ll explore automation of scriptable applications following the approach introduced parts one through three.

I’m having terrific trouble with the
#import
in AcornScripting.h
I don’t have Acorn so I followed all the steps using the Finder app.
So, I used
#import
in SwiftFinderScripting.h
The problem is: I get an error
“include of non-modular header inside framework module ‘SwiftFinderScripting'”
where the header reference has been added.
I have made sure both headers are Public and changed
“Allow non-modular headers” to Yes.
I’ve been using AppleScript for years and the idea of using the same scriptable methods from Apple applications is very exciting to me.
Is there any suggestion you can make to clear this error?
Bump (forgot to check send email when reply)
I did write the #import lines as written in your guide but the less-than, greater-than signs are not appearing in my post. The first appears to have been interpreted as newline and the word “in”
You can examine the FinderScripting framework at https://github.com/tingraldi/SwiftScripting/tree/master/Frameworks/FinderScripting for reference. Please note that the code on GitHub is not yet compatible with Swift 2.0. I’m working on updates for Swift 2.0.